
Product Guide
Outline Mode for Journals
Flojourn allows you to organise journal entries into a hierarchy using outline mode.
The entries in a Journal are shown in a list from the newest at the top to the oldest at the bottom. Sometimes you may want to organise the entries in a Journal into a different order and give it some sort of hierarchy.
For instance, if you wanted to create a sort of procedures handbook for your group, you might want to divide the entries up into general areas (like chapters) and then have entries within those.
Outline mode helps you achieve this. Outline mode temporarily replaces the normal NavList with an outline of your Journal reflecting the titles and hierarchy you have created. This also adds navigation buttons to the Journal entries so that someone viewing the journal can traverse the structure more easily. When an entry has subitems, there will be links to go to those subitems at the bottom of the entry.
Outline Mode Tab
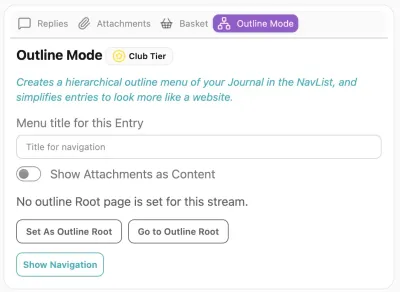
At the bottom of the entries of your Journal there are four tabs starting with Replies and ending with Outline mode. On the Outline Mode tab, you will find a few simply controls.
Menu title for this Entry - Only entries you give titles will appear in the outline. This give you complete control over what appears in the outline and how it reads. ie it does not rely on using any of the text in the actual entry.
Show Attachments as Content - This toggle determines if the attachments on this entry will be used as child pages (the default) or if they will be displayed as content along with the current entry.
For instance if the entry was about who the officers of the club are, you might then have an attachment for each of the officers (eg Club President, Secretary, etc). These bios might be short so they would make more sense just listed beneath the introduction about the officers.
If on the other hand an entry was about procedures for different activities of the club, each entry might be more substantial and better shown on its own.
Set As Outline Root / Remove Root Page - An outline needs a root entry from which all other entries descend. You choose which entry is the root by going to it and clicking the "Set as Outline Root" button. If you want to change the root page go to it and click the same button. Only one entry will be root at any given time.
Go to Outline Root - This button will take you to the root entry from any other entry in the Journal.
Hide From Menu - Although a hierarchy needs a root entry, it may be preferable to have more than one top level item (like chapters) rather than a single top level item and everything else indented as a subitem. This button removes the root entry from the visible hierarchy, although it remains the root internally.
Show Navigation - This gives a preview of the NavList outline. This is useful to track your progress while authoring, but it is also a useful way to get to any other entry in the journal.
Attachement List
Hierarchy is created using the Attachments List on each entry. The attached entries on the root entry become the top level chapters. The entries in the attachments on those become the second level entries and so on. There is no limit to the depth and you can have an entry in more than one place.
View Mode Menu
When a Journal has a Root entry, the Outline View is added to the menu at the top of the Journal that has "List", "Map", "Calendar", and "Special". Choosing "Outline" will show the Journal in outline mode. But you can also view it in the other modes if those help you navigate the entries in better ways.